Kitchen Garden Tales With The Adamses

Almost 4 years after moving into Craig’s tiny (big) house, my garden dreams are finally coming to fruition. We’re building raised garden beds!

Honestly I’ve never considered myself having much of a green thumb. Every plant I’ve ever tried to grow has died by my own hand, yet somehow I still want to keep on trying. Does that make me an unintentional serial killer?

Nevertheless, I’m super excited about the possibilities of growing our own fruits and vegetables and so is Craig.

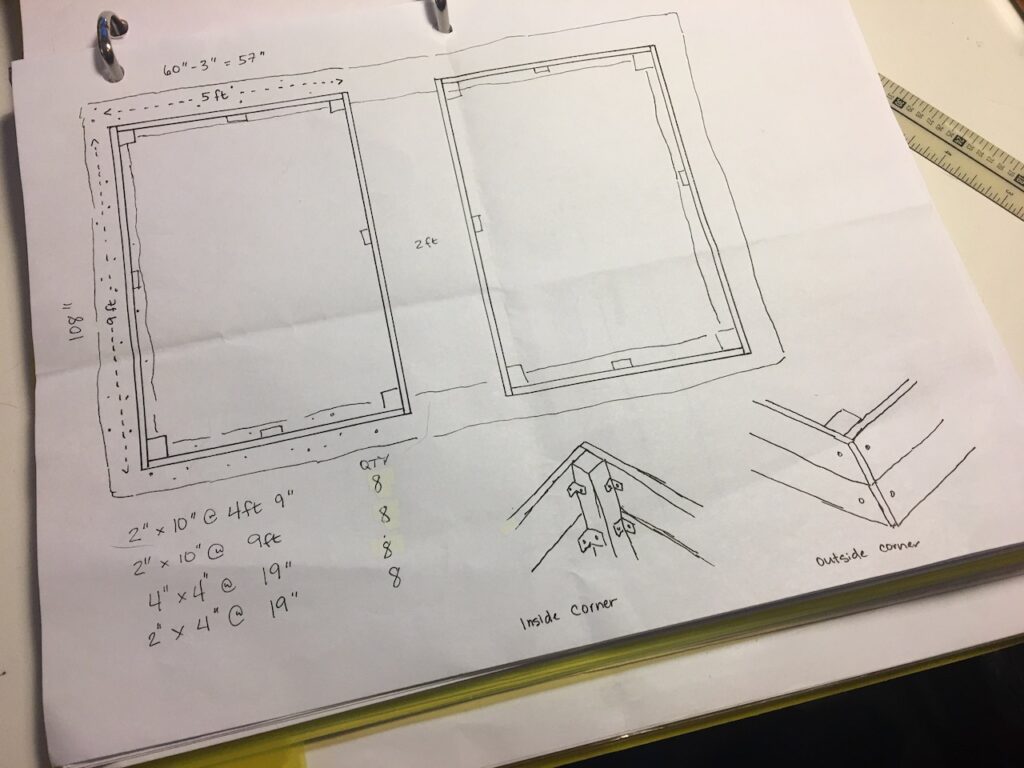
The Garden Schematics

Our plan is to have 2 raised garden beds that are 9 by 5 feet in area which gives us a total of 90 square feet of growing space. That’s A LOT of room. Considering we can have 1 or more plants per square foot of growing space, that’s enough to feed a large family.

It’s not drawn to scale or anything like that, but I tried to draw it close enough to suggest measurements.

The two beds will sit on top of the cement fixture. The inside of the fixture is still pretty sunken, so I’m considering filling it with bulk drainage rock to make it level.

I don’t know whether or not we’ll build both in the same season. It’s definitely a lot of work to take on for two inexperienced gardeners. At this point I think we should just build one and get it going, learn from it, and then build the second one later this year. Hopefully by then we would have learned what to do from any mistakes we made with the first garden.

Picking Out the Location

We have a pretty large backyard that gets a good amount of sun during the day. The only thing is that the sunny part of the yard has this strange 10 foot by 13 foot pool structure that was filled in with dirt long before Craig moved in.

Ugh. What an eyesore. But look at the great sunlight it gets during the day!

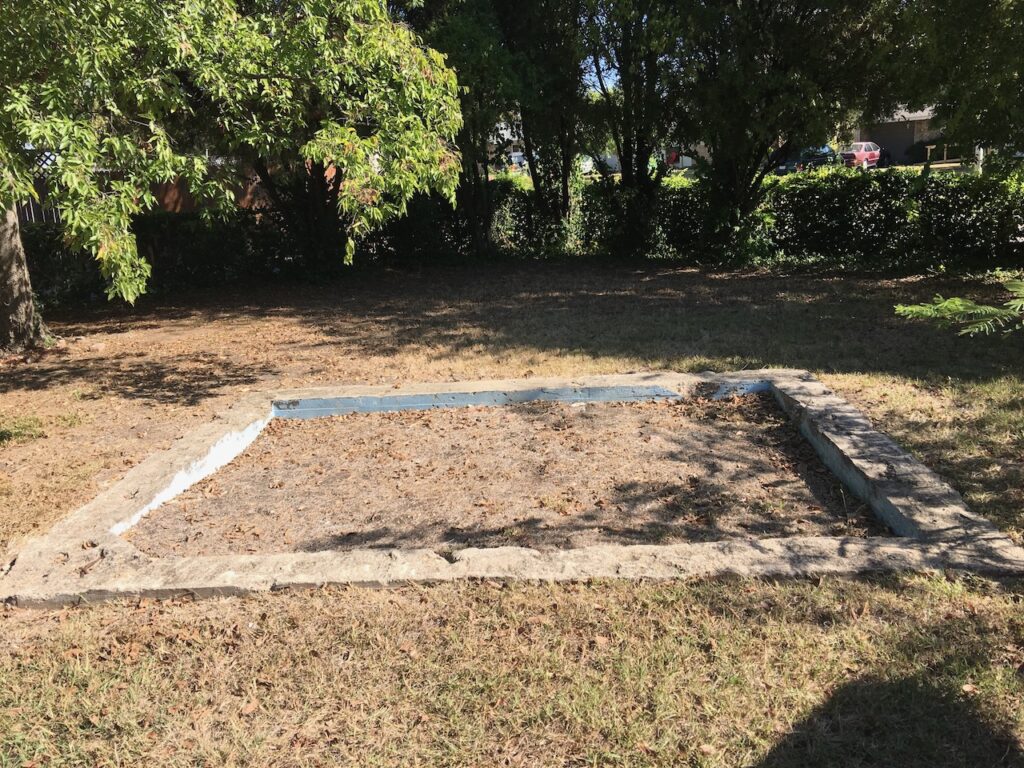
Because it’s the perfect spot for a vegetable garden, demolishing it would be too expensive and too time consuming. Instead, we’re choosing to build two 9 foot by 5 foot raised garden beds on top of it. And because we really don’t want to utilize the growing medium inside of it (because who knows what kind of stuff is buried in there), we’re just going to grow on top of it.

According to the Square Foot Gardening Foundation, they recommend only a 6 inch depth of growing space for a raised garden bed, but if you want to grow root vegetables like carrots and potatoes, you’ll probably need at least 12 inches. Since we’re building on top of a giant bath tub essentially, we’re making it 20 inches both for the space as well as the height (to save our backs!).

Buying the Materials

So the weekend before Christmas we made a special trip to our local home improvement store and bought a significant load of lumber. We were concerned at first about being able to transport all of it home, but thanks to their cutting abilities, and our full sized sedan, we managed to fit all of it into our car and almost got the trunk closed. We had one 4 by 4 that was sticking out but other than that, we got everything else to fit!

If you think you need a gas guzzling, monster truck or SUV to haul a meager amount of lumber, think again! We got by just fine in our modest Toyota Camry.

There was one concern about cutting the 4 by 4. The store was only equipped to cut planks so we had to find a way to cut this one ourselves. I know my dad probably has one, but I didn’t really want to go on a hunt for a table saw or miter saw in their storage shed. We ended up bringing home a lightweight DeWalt Circular Saw.

The Finished Product

Well because we started this project right before the holidays (and also because we’re both pretty new at building things), it took us a few days spanned over a few weeks to finally complete the raised bed.

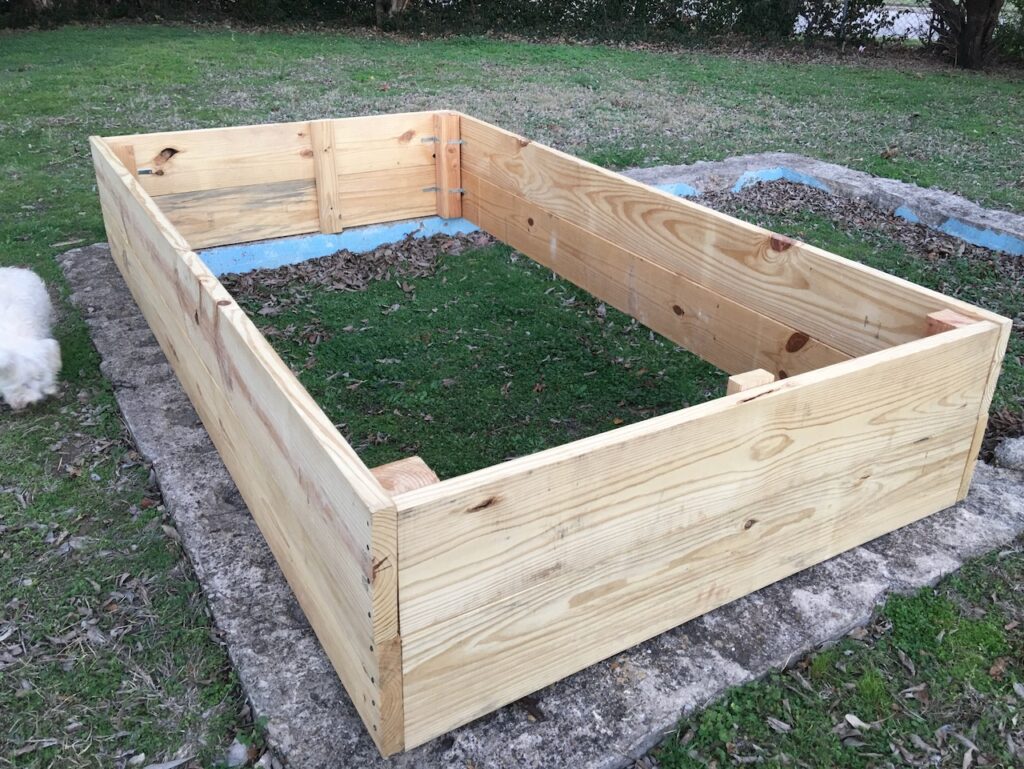
The idea is to level the pool structure underneath with drainage rock before layering in the bedding soil. I’m not sure yet if I want to put in a layer of landscape fabric first on top of the drainage rock before adding the soil, but considering the unevenness of the cement frame underneath, it will probably be a good idea especially to minimize erosion.

I’m relieved we’re finished with this phase though and I’m glad we only built 1 raised bed for now. This one was indeed a learning experience for us so hopefully the next one we build will be easier.

My seeds are still growing indoors so I’ll post some progress photos on that, but now I can’t wait to start planting!

Rattlenake Plant: The Disco Plant of the Plant World

A couple months ago, my friend and work colleague Rhea gave me this rattlesnake plant for my birthday despite repeated warnings from me that I was a plant killer. And like an unplanned pregnancy, I took on the role reluctantly and kept the darn thing. Also it was a pretty plant and my desk at work was bare, except for a wedding photo and a coffee mug that needed to be cleaned out 3 weeks prior.

This is what Gladys looked like when I first got her. Yeah, I’m calling her Gladys now.

Fast forward to December, Gladys is thriving much to my surprise. A lot of gardening sites state that rattlesnake plants require medium to low light and in fact will actually burn in direct sunlight. This is perfect since I sit about 5 feet away from the nearest window.

However, one thing I noticed about Gladys is that she has some interesting sleep habits. During the day, her leaves just kinda “sleep” and sit normally. But by late in the afternoon, they perk up. 

A recent photo of Gladys taken at 9:42 a.m. Clearly she’s asleep. Don’t tell her I snapped a photo of her in her jammies and posted it on the internet.
A photo of Gladys at 5:10 p.m. with her makeup done and her dancing shoes on. Totally different plant, right?

I joke that she’s adopted the sleeping pattern of her owner, as no one is as familiar with daytime napping such as myself.


Rose Mosaic Virus: How Bad Is It?

Last year I noticed something really strange about my adopted rose bush, the Peace rose. It had produced a few mottled leaves here and there. I discovered this in the earlier part of the growing season.

As the months wore on, the mottling gradually disappeared. I thought nothing of it after that.

Rose Mosaic Virus
One of the leaves showing the strongest webbing of discoloration.

Today I was watering the flowers because temperatures began rising into the upper 80s and lower 90s these last few days. Afterward, I examined the Peace rose and once again noticed a couple leaves–not as many as last year–had some significant mottling. I Googled this information. Apparently rose bushes have their own version of WebMD on the internet. And as soon as I managed to identify and match what I was seeing to what I found on the internet I discovered my rose unfortunately suffers from Rose Mosaic Virus.

Opinions vary from extreme (“We don’t know anything about Rose Mosaic so you should destroy the bush and destroy the soil it lived in. LET IT BURN!) to, well, not so extreme (“The virus doesn’t do much to the bush other than make early leaves look weird. It may stunt the growth of branches, but most bushes go on to produce beautiful flowers anyway.”) They’re even conflicting. Some say it spreads through the pollen, others say it’s spread through propagation, which is especially why it’s most common in grafted roses. And I suppose it makes sense why this rose has always been such a small dwarf despite it being a hybrid tea.

Either way, I’m torn. I don’t want to put my other roses in danger. But then again, are they really in danger if the virus isn’t fatal? Maybe it’s just like a limp or a genetic defect. Does it warrant destroying a perfectly good rose bush that seems to have lived with this virus many years? Please keep in mind that this year, this rose bush has produced the biggest, healthiest most beautiful blooms that I’ve seen since I’ve lived here. Below are some pictures from April.

Peace Rose
Peace produced around 12 grand blooms over the springtime, all on its dwarfed limbs. This is the most I’ve seen it produce ever.

Peace Rose
A photo from early April. Blooms were around 4″ in size.

The Little Rose Bush That Could

For the first part of the season, I was feeling quite proud of myself. I had identified the Peace hybrid tea rose in our front yard. It had also produced two of the most stunning blooms I’d ever seen it produce.

Two weeks later, the new growth slowed and almost came to a halt. There were 9 new buds forming. The younger 4 of them haven’t formed completely, while the other older 4 are kicking it into high gear. As a result, the younger leaves don’t seem to be growing very well either.

Stunted new growth on Peace.

It wasn’t until after a thorough inspection of the canes and leaves that I discovered rose mildew.

Rose mildew on leaves

But… was the rose mildew there because the new growth was stunted? Or was the new growth stunted by the mildew? It was a case of, “Which came first: the chicken or the egg?”

Either way I had to do some serious research and fast. I’ve heard a lot of bad things about mildew.

I came across one particular article that offered a homemade solution on how to get rid of mildew on roses. I wanted to get a head start on controlling the disease and since I already had all the ingredients available, I decided to whip it up.

Homemade Fungicidal Rose Spray

  • 2 quarts of water
  • 2 teaspoons of baking soda
  • ½ teaspoon of liquid soap (I used simple dish soap)

Directions: Mix all ingredients well before pouring into a spray bottle. Apply evenly to leaves and canes in the morning to avoid burn.

Note: This recipe reduces and multiplies really well.

To treat a mildewy rose bush,  start by preparing an anti-bacterial cleansing solution of 1 part bleach to 4 parts water. You’ll need this to clean your pruning shears before and after you trim any diseased leaves and canes from the plant. You’ll also need a plastic bag and your bottle of fungicidal spray.

Next, make sure your hands and arms are protected with thick gloves and layers of clothing. Using your clean shears, remove any leaf clusters and canes that have signs of mildew. Place them in the plastic bag, being careful not to have them come in contact with any other rose bushes or plants in the vicinity.

While you’re in this stage, you may as well trim off as many leaves and unnecessary canes as possible in order to make sure the shrub gets as much airflow to keep the leaves dry and disease free once you’re done.

Once you’re done with your pruning, securely tie off the plastic bag and throw it in the garbage. Do not compost.

Spray the canes and leaves evenly with one layer of the fungicidal spray. Reapply weekly until signs of mildew have reduced or disappeared. Reapply after rain. .

Clean your pruning shears and whatever tools came in contact with the diseased bush in the bleach solution you made earlier. Toss your gardening gloves in the wash.

Peace Rose Prognosis

After the first treatment, I saw an improvement almost overnight. The leaves that were still maroon and weak were beginning to turn green. And two buds opened later that week.

There were still some canes that showed signs of rose mildew, so I repeated the process of trimming the leaves and spraying. Another week passed and almost all major canes showed significant signs of improvement, with the exception of one that’s still struggling.

The latest update on Peace. She’s doing much better. Most of the diseased leaves have been removed and the buds that were struggling are finally opening.

Preventing Rose Mildew

Besides the homemade fungicide and all the other commercial fungicides available at local retailers, there are other steps you can take to reduce the chances of your roses falling victim to this ruthless disease.

Prune well. I think this is probably one area where I failed. There were parts of the bush that were taken over by leaf clusters. Having poor airflow through the plant creates the perfect environment for mildew to grow. And since we had been experiencing some cool, high humidity spring days, that made it even worse.

Gently shower the plant with water first thing in the morning. Showering the plant with water may sound contradictory to keeping the plant dry, but just a bit of water can help wash away any bugs, mites, or spores. It’s important to do this step first thing in the morning (not at night) especially on a forecasted sunny day. As long as your rose gets full sun at least 6 hours a day, most of the water will evaporate off the leaves within an hour or so.

Water the base of the plant in the morning. Last but not least, don’t water too late in the day. Your rose needs all day to be able to absorb the nutrients from the ground before going to “sleep” at night. I mean really, do you like going to sleep with wet socks and shoes? Your rose doesn’t either.

Keeping mildew away from your precious roses can be easy as long as you adopt a few habits that will keep your rose bush in tip top shape.

Photos: Kristine Macabare.

Kindred Spirit

Craig and I finally brought my mom the rose bush we gave to her as a wedding party gift. It was a David Austin English rose called Sceptered Isle. It was beginning to develop a home on our front porch and even started to grow two buds despite the fact it was still in its temporary pot. This is what it will look like when fully grown.

David Austin Scepter'd Isle Rose
Fully-grown Scepter’d Isle roses

I also bought her a bag of potting soil because she was running low. It would save her from having to deal with lugging the heavy bag by herself.

While we were at her house, she gave us a tour of some of the things she’s been up to in the backyard. When I was a kid, she and my dad would spend long hours on the weekend and on their days off working out in the yard. It was just something they enjoyed doing.

But now my mom is entering her 80s. She’s not as mobile as she once was and their backyard, which has now become a bit poorly maintained in some areas, is also quite dangerous for someone like her. She’s limited herself only to the patio because of this.

All of her roses have been transplanted out of the ground and into pots for the patio. The containers make it easier for her to care for them. She showed me the different roses she was growing, one of which was a rose bush that bore lavender blooms. This is one I don’t think I’ve ever come across before. Unfortunately, it only bloomed once a season and that was it. She did manage to take a photo of it and showed it to me on her phone.

We both talked excitedly about rose growing and I told her about the various endeavors I was undertaking. I told her we just planted the climbing rose that I ordered before the wedding and I showed her a picture of the blooms it’s supposed to produce. I told her our yard gets quite a lot of sunlight so I was eager to plant a rose garden. That was when she offered me one of her miniature roses to take home.

I smiled. I felt like we finally had a mutual interest that we bonded over.

I used to be adamant about being a city bachelorette and never wanting a yard to keep up because it would interfere with my nightly routine of going out. But here I am. Not only have I settled down and married the kindest, most devoted man, but I’ve also surrendered to my love for gardening as well. So things might not end up the way you expected, but just know it’s probably because that’s the way it was always supposed to be.